
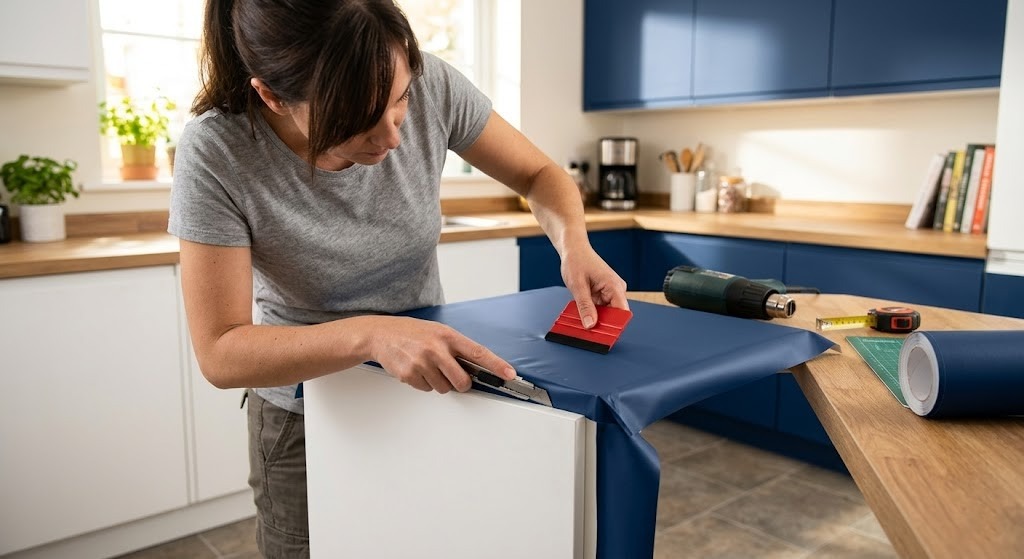
Summary: Transforming Your Kitchen on a Budget
Tired of your outdated kitchen but terrified of the expensive renovation costs? Using vinyl wrap for kitchen cupboards is the ultimate budget-friendly, mess-free solution to modernise your space immediately. This self-adhesive hero lets you achieve a flawless, professional finish in just one weekend.
- Instantly update tired cupboard doors without power tools, loud construction, or messy paint.
- Save thousands of pounds compared to a full, disruptive kitchen refit while achieving a bespoke aesthetic.
- Enjoy a highly durable, water-resistant finish that is entirely reversible and perfectly renter-friendly.
Why Should You Choose a Kitchen Unit Makeover Over a Costly Replacement?
Opting for a vinyl makeover saves you significant money and drastically reduces environmental waste. It offers an instant, trend-led refresh without the chaotic disruption of tearing out perfectly good cabinets, allowing you to achieve a beautiful aesthetic at an affordable price.
The financial benefits of upcycling are undeniable when you consider current property market prices. According to a recent Houzz UK report, the median spend for a kitchen renovation rose to £17,500 in 2024. By choosing a kitchen unit makeover vinyl project, you can bypass these hefty construction costs entirely while achieving a spectacular, high-end look for a mere fraction of the price.
Beyond protecting your wallet, upcycling is absolutely essential for protecting our planet. The UK discards an astonishing 22 million pieces of furniture annually, sending perfectly sound wooden units straight into overflowing landfills. Furthermore, research indicates that refurbishing old items rather than buying new can produce up to 1000 times less CO₂, making your DIY project an incredible eco-friendly triumph.
How Do You Accurately Measure for Your Kitchen Cabinet Vinyl Wrap UK Project?
Accurate measurement is the absolute foundation of a successful, stress-free upcycle. You must measure the height and width of every single door and drawer front, adding a crucial five-centimetre allowance to all sides to account for overlapping edges.
Grab your measuring tape and carefully log the dimensions of each individual unit on a notepad. Do not simply guess or assume all your standard doors are exactly the same size. Older kitchens often feature slight variations in cabinetry sizes, and missing these discrepancies can leave you frustratingly short on materials mid-project.
If you are using a wrap with a distinct wood grain or geometric pattern, you must factor in the direction of the design. Once you have your final square metre tally, it is highly recommended to order an extra ten per cent of material. Having spare kitchen cabinet vinyl wrap UK stock on hand completely removes the anxiety from the application process and covers any minor measuring mishaps.
How Do You Cut Vinyl Wrap for a Seamless, Professional Edge?
Creating a seamless edge requires a steady hand, a flat surface, and a very sharp blade. You should always cut the vinyl face down on a protective mat using a sturdy metal ruler to guide your craft knife for perfectly straight lines.
Before making a single cut, unroll your wrap and let it acclimate to the room temperature for an hour. This brilliant interior design trick stops the material from curling tightly, making it far easier to handle and measure. Lay your door directly onto the backing paper and use your pencil to trace the required shape, remembering to include that essential five-centimetre overhang for the back wrap.
Always use a fresh blade in your craft knife for this crucial task. A blunt blade will drag, tear, or snag the delicate vinyl, ruining that crisp edge you are aiming for. A clean, precise cut is the ultimate secret to a flawless finish that perfectly rivals a factory standard.
How Do You Prepare Kitchen Cupboards for a Flawless Wrap Application?
Proper preparation guarantees a flawless, long-lasting finish that will not peel or bubble over time. You must thoroughly clean your cupboard doors to remove all hidden grease, fill any deep scratches, and take off all hardware like handles.
Grease is the absolute worst enemy of adhesion in any kitchen environment. You need to scrub every surface, edge, and intricate groove with a heavy-duty degreaser or sugar soap to ensure the peel and stick furniture wrap adheres flawlessly. Once impeccably clean, wipe the doors down with plain water and allow them to dry completely before you even think about sticking anything down.
If your older doors have noticeable dents or deep scratches, fill them with a little wood filler and lightly sand the area smooth. Taking your cabinet doors off their hinges and laying them flat on a clean workbench makes the wrapping process significantly smoother. If you feel unsure about this initial prep work, learning how to apply vinyl wrap to furniture will give you the essential confidence to start strong.
What Tools Do You Actually Need to Wrap Kitchen Doors Yourself?
You only need a few simple, inexpensive tools to achieve a smooth, wonderfully professional result. The right equipment prevents frustrating air bubbles, ensures crisp edges, and makes the entire DIY wrapping process significantly easier to manage.
You absolutely do not need an entire construction workshop to complete this easy weekend project. Gathering your supplies beforehand keeps your workflow steady, focused, and entirely stress-free. Here is exactly what you need in your upcycling toolkit to successfully wrap kitchen doors yourself:
- A sharp craft knife or scalpel for precision trimming around edges and hinges.
- A flexible felt-edged squeegee to smooth out the material safely without scratching the beautiful surface.
- A hairdryer or heat gun to gently stretch the vinyl over tight, tricky corners.
- A trusty measuring tape, a metal ruler, and a pencil for accurate, confident cutting.
How Can You Apply Vinyl Wrap for Kitchen Cupboards Without Getting Bubbles?
The secret to a bubble-free finish is patience and a highly methodical smoothing technique. You must peel the backing paper gradually, applying the vinyl inches at a time while smoothing it firmly outwards from the centre using your squeegee.
Start by positioning your perfectly cut vinyl wrap for kitchen cupboards over your flat door, ensuring your overhang is even on all sides. You can use a small piece of masking tape to hinge the vinyl in place at the top so it does not shift. Peel back just the first few inches of the backing paper to securely anchor the material down onto the wood.
Using your felt-edged squeegee, press the vinyl onto the surface in sweeping, overlapping motions from the middle towards the outside edges. Never pull the entire backing sheet off at once, as this will inevitably cause the sticky material to fold, stick to itself, and ruin your hard work. If a stubborn bubble does appear, simply lift the vinyl gently to release the trapped air and smooth it back down perfectly flat.
How Do You Neatly Fold Vinyl Wrap Around Tricky Cupboard Corners?
Heat is your creative best friend when tackling stubborn corners and curved cupboard edges. By gently warming the vinyl, it becomes wonderfully pliable and stretchy, allowing you to pull it taut over the edges for a seamless, neat finish.
When you reach a tricky corner, grab your hairdryer and apply medium heat to the overhanging vinyl for just a few seconds. Gently pull the warmed, softened material down and tightly wrap it around the sharp edge, much like wrapping a pristine birthday present. You can then trim away any bulky, folded excess with your craft knife to keep the back of the door perfectly neat and flush.
Take your absolute time with this step, as neat corners are the primary key to a truly professional-looking project. Once everything is securely folded and stuck down, run the heat gun quickly over all the edges one last time to seal the adhesive permanently.
What Are the Best Vinyl Wrap Styles for a Kitchen Transformation on a Budget?
The best style depends entirely on your personal taste and desired home aesthetic. Matte finishes offer a sleek, contemporary vibe, while metallic wraps or trendy textured patterns inject luxurious, bespoke glamour into your space for a fraction of the designer price.
If you want a moody, deeply sophisticated aesthetic, the dark blue matte architectural vinyl wrap is an absolute showstopper. It instantly updates tired shaker doors and pairs beautifully with modern brushed brass or industrial matte black handles. Alternatively, you might want to try a trendy terrazzo wrap to completely revitalise your tired worktops or dining table.
For those wanting to add a bold touch of maximalist luxury, the gold antique metallic steel vinyl wrap creates a breathtaking, expensive-looking focal point on a kitchen island. Mixing and matching these beautiful textures, perhaps pairing a rust patina effect with sleek matte cabinets, is a fantastic trick to learn when exploring how to upcycle furniture at home like a seasoned interior design pro.
How Do You Maintain and Clean Your Newly Wrapped Kitchen Cupboards?
Maintaining your newly wrapped doors is incredibly simple and requires no expensive specialist cleaning products. You just need to wipe them down regularly with a soft, damp microfibre cloth and a mild detergent to keep them looking completely vibrant.
Harsh chemicals, abrasive scouring pads, and aggressive bleach are strictly forbidden when caring for your stunning upcycled units. These abrasive cleaners will eventually scratch the surface of the self-adhesive kitchen wrap or fade the brilliant, rich colour over time. A simple, tiny squirt of washing-up liquid in warm water is more than enough to lift everyday kitchen grease effortlessly and safely.
If you happen to spill something highly pigmented, like rich tomato sauce or red wine, wipe it up immediately to prevent any potential staining. The clever water-resistant nature of Decorwrap products means liquid will bead beautifully on the surface, making rapid daily clean-ups a total breeze.
Is Self-Adhesive Kitchen Wrap Truly Durable for Daily Family Use?
Yes, high-quality architectural vinyl is incredibly robust and strictly built to last. It is engineered specifically for high-traffic areas, offering excellent resistance against daily wear, tear, and moisture, making it perfectly suited for busy, chaotic family homes.
The true beauty of choosing Decorwrap is that our premium products are entirely mess-free, exceptionally durable, and wonderfully renter-friendly. Our thick vinyl creates a tough, wipeable barrier that expertly protects your original cupboard doors from daily stains, sticky fingers, and chaotic splashes. If you ever move out of your rented property or simply change your style, you can gently apply heat and peel the wrap off without damaging the surface underneath.
“Our mission has always been to make premium interior design accessible, fun, and empowering for absolutely everyone,” says Patrick Green, Founder of Decorwrap. “We engineer our vinyl to withstand the daily chaos of family kitchens, ensuring your budget-friendly DIY project looks flawlessly professional for years to come.”
Ready to start your next upcycling project? Contact Decorwrap today for advice on measurements, styles, or application tips, and let’s transform your space.